Easy Braised Beef Recipe for Tender and Flavorful Meals
Braised beef turns tough cuts into tender, flavorful dishes. This method uses low heat and moisture to break down meat fibers. You get tender beef without spending hours cooking or learning hard techniques.
An easy braised beef recipe is perfect for any day. It needs little effort from you. Just sear the meat, make a flavorful liquid, and let the oven do the rest. Your family will think you worked all day, but you relaxed most of the time.
This method uses common ingredients like onions, garlic, beef broth, and herbs. These create a rich sauce that sticks to the meat. The longer it braises, the more tender and tasty it gets.
This guide covers everything about braising beef. You’ll learn which cuts are best and the exact steps. You’ll also get tips for perfect results every time. Whether for your family or guests, this method ensures a delicious meal.
Key Takeaways
- Braising is an accessible cooking technique that transforms budget-friendly beef cuts into tender, flavorful meals
- Chuck roast and short ribs are ideal cuts for braising due to their marbling and connective tissue
- The basic braising method involves searing meat, building a flavorful liquid, and slow cooking in the oven
- Braised beef tastes even better the next day, making it perfect for meal prep and entertaining
- Proper storage and reheating techniques keep your braised beef delicious for days
- This cooking method requires minimal hands-on effort for maximum flavor
Why Braised Beef Is the Ultimate Comfort Food
Braised beef is a top comfort food for many reasons. It turns tough meat into tender, tasty dishes that warm you up. This happens when you mix simple ingredients with time and heat. Your kitchen fills with delicious smells that make you excited for dinner.
The beef slowly cooks in its liquid, making it taste like you spent hours cooking. But, most of the time, you don’t have to do much.
Braised beef is great for any event. It’s perfect for family dinners or quick meals on busy nights. Plus, you can make it a day ahead, which makes hosting easy and lets the flavors get even better.
Low Effort, High Reward Cooking
Braising is easy to do. Just sear the meat, add liquid, and let the oven do the work. This method saves time but gives you amazing flavors. You don’t spend much time cooking, but the taste is top-notch.
- Sear the beef quickly in a hot pot
- Add your liquid and aromatics
- Cover and transfer to the oven
- Check occasionally until meat becomes tender
This method lets you start dinner and then relax. You don’t need to stir or watch it constantly. Plus, it’s easy to clean up afterwards.
Perfect for Family Dinners and Entertaining
Braised beef tastes even better the next day. This makes it perfect for making ahead when you have guests. It’s also great for making different meals throughout the week.
| Occasion | Preparation Timing | Key Advantage |
|---|---|---|
| Weeknight Family Dinners | Cook 1-2 days ahead | Quick reheating, more family time |
| Entertaining Guests | Prepare 2-3 days before | Enhanced flavors, reduced stress |
| Meal Prep | Cook once, use multiple times | Versatile for various meals |
| Holiday Gatherings | Prepare day before service | Free oven space day-of, minimal reheating |
Braising is easy to clean up, so you can focus on enjoying time with family. Instead of doing dishes, you can talk and bond. Braised beef is a great choice for any gathering because it’s easy to make and brings everyone together.
Understanding the Braising Technique
Braising is a cooking method that combines wet and dry heat. It turns tough meat into tender, flavorful dishes. You start by searing the meat at high heat, then cook it gently in liquid.
This technique has two stages. First, you sear the beef at high temperatures. This creates a brown crust through the Maillard reaction. This crust adds complex flavors to your dish.
Next, you add liquid and cover the pot. The meat cooks slowly in the steam. This breaks down tough tissues, making the meat tender.
Braising is great for many dishes, like one pot beef pasta. It works with beef, pork, chicken, and vegetables. You can make everything from French onion braised beef to simple weeknight dinners.
| Braising Stage | Heat Type | Temperature | Purpose |
|---|---|---|---|
| Searing | Dry Heat | High (400-500°F) | Create brown crust and develop flavor |
| Braising | Wet Heat | Low (300-325°F) | Break down collagen and tenderize meat |
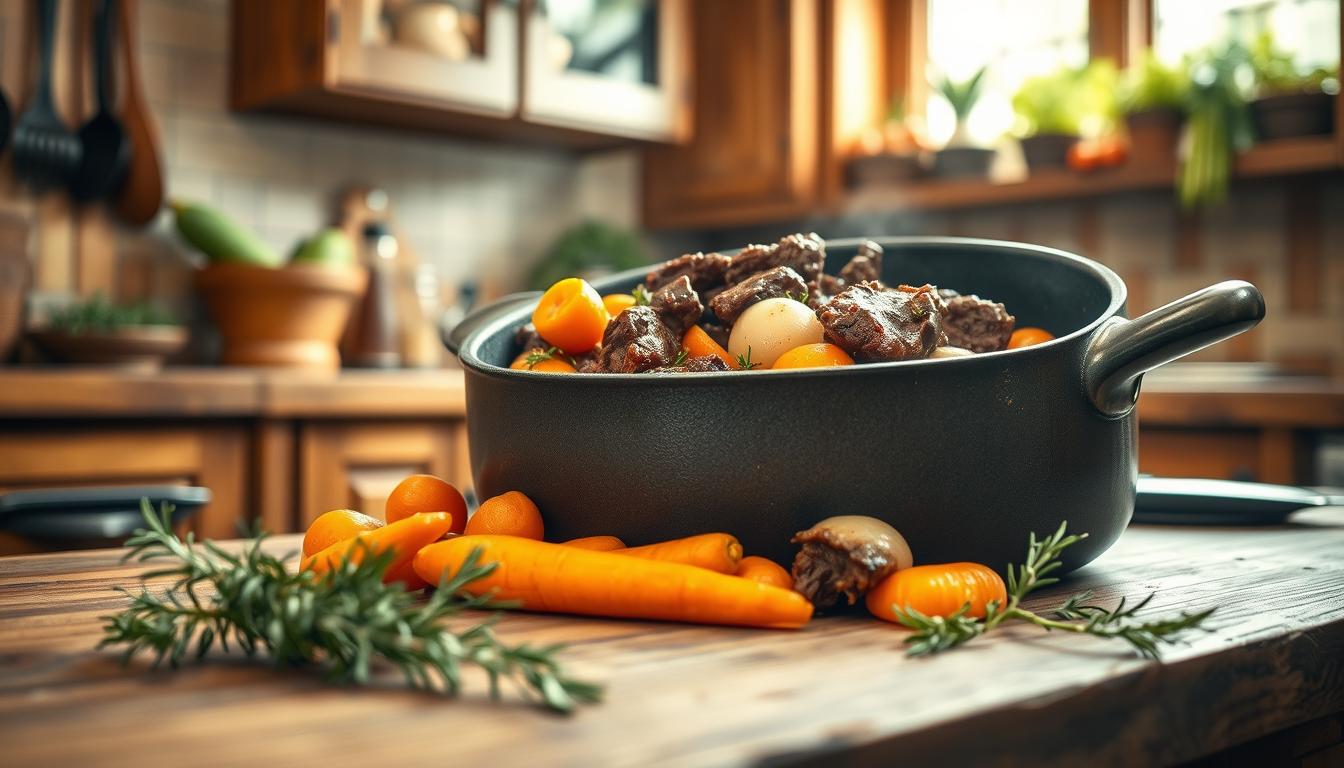
The braising technique is perfect for tougher, less expensive cuts. Brisket, chuck roast, and short ribs become tender and delicious. Your kitchen will fill with amazing aromas as it cooks.
Best Cuts of Beef for Braising
Choosing the right cut of beef is key to braising success. The right cut can make your meat tender and delicious. The best cuts have lots of fat and connective tissue that get tender during slow cooking.
At the butcher counter, you’ll find great cuts for braising. Each cut has its own benefits, making it important to know what works best for you.
Chuck Roast and Short Ribs
Chuck roast is a top choice for braising. It comes from the shoulder and is full of connective tissue. This makes the meat tender and flavorful, perfect for family meals or savory beef noodles.
Short ribs have rich flavor and lots of marbling. They become very tender and the bone adds depth to the sauce. Both cuts are worth the cooking time.
Consider these other great cuts:
- Brisket
- Oxtail
- Beef shank
Why Marbled Cuts Work Best
Marbled beef cuts are best because they have fat that bastes the meat as it cooks. This fat keeps the meat moist and tender. The collagen turns into gelatin, making the meat melt in your mouth and the sauce silky.
Lean cuts like sirloin or tenderloin won’t work well. They dry out and get tough because they lack the fat and collagen needed. Your braised beef needs those marbled cuts to be tender.
| Beef Cut | Fat Content | Tenderness Result | Best Use |
|---|---|---|---|
| Chuck roast | High marbling | Very tender | Everyday braising, budget-friendly meals |
| Short ribs | Substantial marbling | Fall-off-the-bone | Special occasions, rich dishes |
| Brisket | Well-marbled | Tender when slow-cooked | Large portions, feeding crowds |
| Beef shank | Moderate marbling | Tender, gelatinous | Stocks, savory beef noodles |
| Sirloin | Low fat | Tough, dry | Not recommended for braising |
Knowing the science behind cut selection helps you make better choices at the butcher counter. This way, you avoid disappointing results.
Essential Tools and Equipment for Perfect Braised Beef
Having the right kitchen tools makes braising easier and more successful. A quality Dutch oven is the most important piece of braising equipment. It’s a heavy-bottomed pot with a tight-fitting lid, perfect for tender, flavorful braised beef. A 6 to 7-quart Dutch oven is ideal for 3 to 4 pounds of meat, vegetables, and liquid.
Cast iron and enameled cast iron Dutch ovens heat evenly and last for generations. Their thick walls prevent hot spots that could burn your food. The sealed lid traps steam and moisture, creating the perfect environment for slow cooking beef until it falls apart.

- Sharp chef’s knife and cutting board for prep work
- Mandoline slicer for uniform onion slices that caramelize evenly
- Tongs for turning meat during searing
- Meat thermometer to test doneness
While other heavy pots or even a quick beef pasta skillet can work, a quality Dutch oven is a better choice. It’s a lifelong kitchen investment for countless recipes. Your braising equipment becomes a go-to for everything from beef stews to casseroles.
| Equipment | Size/Type | Purpose |
|---|---|---|
| Dutch Oven | 6-7 quart | Main braising pot with even heat distribution |
| Chef’s Knife | 8-inch blade | Cutting meat and vegetables |
| Mandoline Slicer | Standard | Creating thin, even onion slices |
| Meat Thermometer | Instant-read | Checking internal temperature for doneness |
Step-by-Step Guide to Making Braised Beef
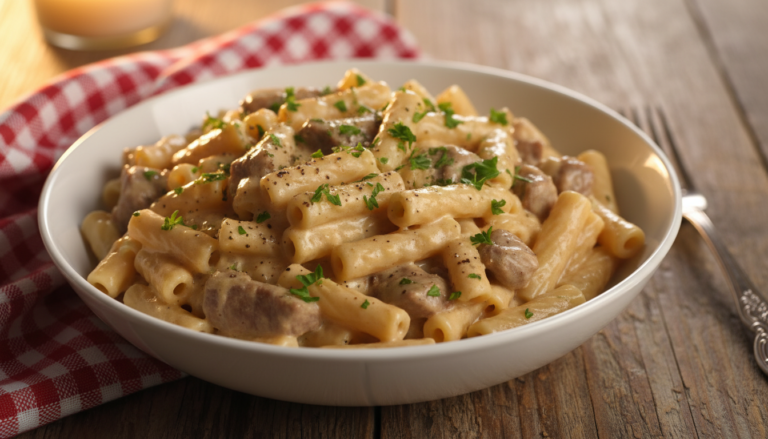
Learning to cook braised beef involves three main steps. This guide will walk you through each step to achieve tender, flavorful results. By following these steps, you can turn tough cuts into tender, delicious dishes. These are perfect for any meal, like an easy beef pasta dinner when you shred the meat and mix it with noodles.
Searing the Beef for Maximum Flavor
Begin by preparing your meat right. Cut your beef into 2-inch cubes and season with salt and pepper. Make sure to pat the pieces dry. This step is crucial to prevent steaming and help with browning.
Heat oil in a Dutch oven over medium heat until it shimmers. Place the beef in a single layer without overcrowding. If needed, cook in batches. Sear each side for 4-5 minutes until it’s deeply browned. Don’t move the pieces while cooking. This step is key to creating rich flavors in your dish.
Building the Braising Liquid
After searing the beef, remove it and set it aside. Add butter to the pot and lower the heat to medium-low. Add onions and cover for 5 minutes. Then, uncover and cook for 30-40 minutes until they’re caramelized.
Stir in Worcestershire sauce, Dijon mustard, and flour to make a paste. Pour in vermouth and simmer for 5 minutes. Next, add beef stock and season with salt and pepper. This liquid is crucial for tender results.
Slow Cooking to Tender Perfection
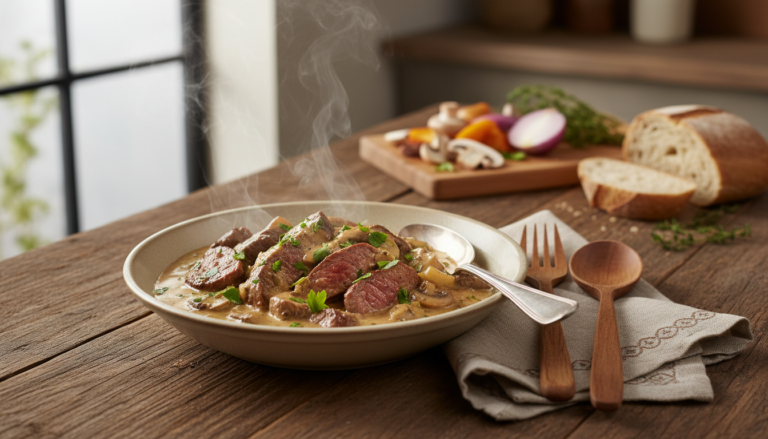
Put the seared beef back in the pot. Add bay leaves and fresh thyme. Cover tightly and bake at 350°F for 3 hours. The meat should shred easily with a fork. Let the cooked beef rest for 15 minutes before serving. This step helps the juices reabsorb into the meat, enhancing both texture and flavor.
| Phase | Temperature | Time | Key Action |
|---|---|---|---|
| Searing | Medium Heat | 4-5 minutes per side | Develop deep brown crust |
| Building Liquid | Medium-Low Heat | 40-45 minutes | Caramelize onions and create sauce |
| Braising | 350°F Oven | 3 hours | Cook until tender and shredable |
| Resting | Room Temperature | 15 minutes | Allow juices to reabsorb |
French Onion Braised Beef Recipe
This recipe combines two comfort food classics into one amazing dish. It has tender beef, rich caramelized onions, and melted cheese. It serves six and is easy to make, just like a restaurant dish.

Ingredients You’ll Need
Here’s what you need for your French onion braised beef:
- 2 tablespoons neutral oil
- 3 pounds beef chuck roast, cut into cubes
- 3 tablespoons butter
- 4 yellow onions, thinly sliced
- 4 garlic cloves, thinly sliced
- 2 tablespoons Dijon mustard
- 1 tablespoon Worcestershire sauce
- 3 tablespoons all-purpose flour
- 1 cup dry vermouth
- 4 cups beef stock
- 2 fresh bay leaves
- 8 sprigs fresh thyme
- Salt and pepper to taste
For the Gruyère topping:
- 1 demi baguette, sliced
- 3 tablespoons olive oil
- 4 ounces Gruyère cheese, grated
- 2 tablespoons fresh thyme leaves
Cooking Instructions
First, heat your oven to 350°F. This is the best temperature for slow cooking. Dry your beef and season it with salt and pepper. Heat oil in a large Dutch oven over medium-high heat. Brown your beef in batches, about 3-4 minutes each side.
Then, melt butter and add onions. Cook them slowly for 30-40 minutes, stirring now and then. You want them to be deep golden and sweet. Add garlic for the last few minutes.
Stir in mustard and Worcestershire sauce, then add flour. Cook for 1-2 minutes. Pour in vermouth and beef stock, scraping the pot. Return your beef, add bay leaves and thyme, and cover. Braise for 3 hours until the beef is tender.
Finishing Touches
To finish, toast your baguette slices with olive oil. Put your braised beef and broth in a dish. Top with toasted bread and Gruyère cheese. Broil for 3-4 minutes until the cheese is golden and bubbly.
| Nutritional Information (Per Serving) | Amount |
|---|---|
| Calories | 680 |
| Protein | 50 grams |
| Fat | 44 grams |
| Carbohydrates | 16 grams |
This recipe impresses with its layers of flavor. It’s different from creamy beef pasta, which uses cream. Your family will love this dish, thinking you spent hours cooking.
Expert Tips for Melt-in-Your-Mouth Results
Learning expert cooking tips can make your braised beef truly special. The key to tender beef tips is mastering technique and patience. By understanding the cooking process, you can create braised beef that wows your guests. These tips help you go from a home cook to a kitchen pro.
Caramelizing Onions Properly
Caramelizing onions is crucial for perfect braised beef. Many cooks hurry this step, ending up with burnt onions. But, real caramelization takes 30 to 40 minutes of slow cooking over medium-low heat. This patience is rewarded with onions that are sweet and golden.
Use a mandoline to slice onions evenly. Even slices cook evenly, avoiding burnt or undercooked onions. Stir them every few minutes to prevent sticking. Stop when they’re deeply golden brown, not dark.
Checking Your Braise for Doneness
Cook by sight and touch, not just the timer. Every oven is different, and so are pot shapes and meat thickness. Check your braise halfway through cooking.
- If the liquid level looks low, add more stock to prevent scorching
- If the meat is browning too quickly, lower the oven temperature by 25 degrees
- The beef is done when it shreds easily with a fork and offers no resistance
- Look for tender beef tips that fall apart at the slightest touch
Don’t skip the searing step at the beginning. Those browned bits add depth to your braising liquid, like homemade pasta sauce. Let your dish rest before serving to keep the meat juicy. Many find braised beef tastes better the next day.
| Cooking Stage | What to Check | What to Adjust |
|---|---|---|
| Halfway Through Braising | Liquid level and meat color | Add stock if dry; lower temp if browning too fast |
| Three-Quarters Through | Meat tenderness with fork test | Continue cooking if still firm |
| Final Stage | Meat shreds easily and falls apart | Remove from oven when fully tender |
| After Cooking | Meat has reabsorbed juices | Rest for 10-15 minutes before serving |
Quality braising comes from understanding your own kitchen and adjusting as needed.
Trust your instincts and learn your oven’s quirks. This builds your kitchen confidence and ensures tender beef tips every time.
What to Serve with Your Braised Beef
Your braised beef needs the right sides to complete the meal. The meat’s rich flavor pairs well with sides that soak up the sauce. Think about textures and tastes that will make your meal satisfying.
Mashed potatoes are a classic choice for braised beef. Their creamy texture is perfect for soaking up the sauce. Buttered egg noodles are also great, with their soft texture holding the sauce well. You can also add braising liquid to your pasta sauce for extra flavor.
Fresh salads are essential to balance your rich main course. A crisp Caesar salad or a bright fattoush salad can refresh your palate. They cut through the heaviness of the beef.
Building Your Complete Meal
For a well-rounded dinner, mix starches and vegetables. Here are some serving suggestions:
- Buttered noodles or egg pasta as your starch base
- Roasted green beans or Brussels sprouts for color and crunch
- A fresh, acidic salad to brighten the plate
- Creamy side dishes like polenta to complement the beef
| Side Dish Option | Best For | Flavor Profile |
|---|---|---|
| Mashed Potatoes | Soaking up sauce | Creamy, mild, buttery |
| Buttered Noodles | Capturing liquid | Soft, savory, rich |
| Caesar Salad | Balancing richness | Fresh, tangy, crisp |
| Roasted Vegetables | Adding nutrition | Caramelized, earthy, sweet |
| Polenta | Creamy alternative | Subtle corn, smooth, comforting |
For dessert, end with something sweet. Chocolate cake, brownies, or fruit-based desserts are perfect. You can even use leftover braising liquid in a lighter pasta dish.
Braised beef is very flexible. It suits both casual family dinners and elegant gatherings. These sides make your main course stand out.
Storing and Reheating Your Braised Beef
Braised beef is great for meal prep because its flavors get better with time. You can feed your family for many meals with one big pot. Knowing how to handle leftovers means you’ll enjoy tender beef all week.
Refrigeration and Freezing Instructions
Let your braised beef cool down before putting it in an airtight container. Keep the meat and liquid together to prevent drying. Your beef will stay fresh and tasty in the fridge for 4 to 6 days.
Freezing beef is a good option for longer storage, keeping it fresh for up to three months. Use freezer-safe bags and remove air before sealing. This prevents freezer burn. Always label your bags with the date. Defrost in the fridge, not at room temperature, for safety.
Best Reheating Methods
Reheating braised beef needs gentle heat. Avoid the microwave as it dries out the meat. Use a Dutch oven or skillet over low heat. Add more broth or water if needed. Cover and warm slowly for 15 to 20 minutes, stirring now and then.
Reheating covered in a 325°F oven for 20 to 30 minutes is also good. This method keeps the beef tender and moist. It’s perfect for busy weeknights and when you have guests.
| Storage Method | Duration | Best For |
|---|---|---|
| Refrigerator (airtight container) | 4-6 days | Quick weeknight meals |
| Freezer (ziplock bag) | Up to 3 months | Longer-term meal planning |
| Dutch oven reheating | 15-20 minutes | Maintaining tender texture |
| Oven reheating (325°F covered) | 20-30 minutes | Gentle, even warming |
“Properly stored braised beef becomes even more flavorful as the ingredients meld together, making it perfect for planning ahead.”
Proper storage and reheating keep your braised beef delicious. Your meal prep beef will taste great on day three just like day one.
Conclusion
You now know the power of easy braising. It turns tough beef into fancy restaurant meals. Just sear, build a braising liquid, and let the oven work its magic. Your dinner will be tender and full of flavor.
This method is simple and forgiving. Even if you’re new to cooking, braising beef is easy to master. It’s all about the right cuts and tools.
Chuck roast and short ribs are the best for braising. Their fat makes the meat tender and juicy. A good Dutch oven is all you need.
Patience is key when searing meat and caramelizing onions. These steps add flavor that’s hard to rush. Each time you practice, cooking gets easier.
The French Onion Braised Beef recipe is a great example. It shows how simple ingredients can impress your family.
Braised beef is even better the next day. This makes meal planning easy. You can prep dinner ahead and reheat it perfectly.
Your friends and family will love the tender, flavorful bites. With what you’ve learned, braising can become a regular part of your cooking. You can stick to the French Onion recipe or try your own variations.
Start braising today. Get a chuck roast or short ribs and follow the steps. Your tender beef dinner is waiting. Enjoy making restaurant-quality comfort food at home.