Easy Crispy Buffalo Chicken Recipe Everyone Will Love
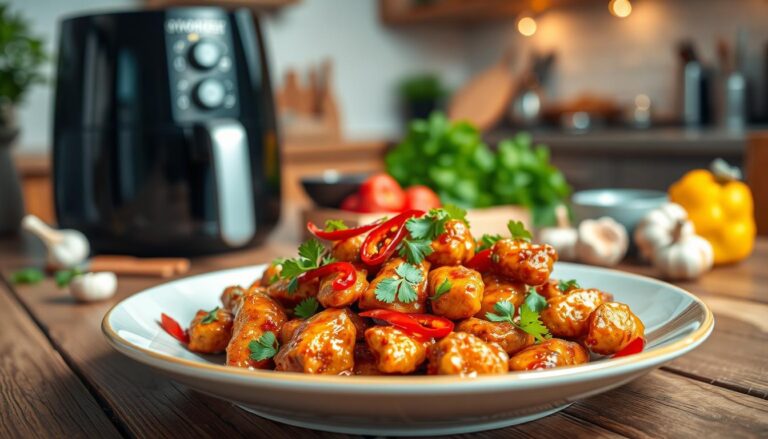
Are you tired of greasy fried wings that make your kitchen smell for days? Now, you can enjoy crispy buffalo chicken at home without the mess and extra calories. This simple recipe turns plain chicken breasts into a restaurant-quality dish in just 10 to 12 minutes.
Easy buffalo chicken doesn’t mean you have to give up flavor or texture. You get the tangy, spicy taste you love from sports bars, but with a lighter cooking method. The panko coating gives a satisfying crunch while keeping the chicken juicy inside.
This recipe is special because it’s so simple. You only need six basic ingredients plus salt and pepper. No fancy equipment or cooking skills are needed. Whether it’s for a busy Tuesday night dinner or a game day party, this crispy buffalo chicken is a hit every time.
Key Takeaways
- This easy buffalo chicken recipe takes just 10 to 12 minutes in the oven
- You need only six simple ingredients to make crispy buffalo chicken at home
- The panko coating delivers a crispy texture while keeping chicken moist inside
- This baked method is healthier than traditional fried buffalo wings
- The recipe works great for weeknight dinners and entertaining guests
- You get restaurant-quality results without leaving your kitchen
Why This Crispy Buffalo Chicken Recipe Is a Game-Changer
Traditional buffalo chicken recipes often involve deep frying. This can make food greasy and clean up a mess. But, this baked buffalo chicken recipe changes the game. It offers bold, tangy flavor with a lighter cooking method.
The chicken turns out tender and juicy, with a crispy coating. And the best part? It’s healthier without losing that authentic buffalo taste.
The secret is a simple marinade that infuses every bite with classic buffalo sauce flavor. Your chicken becomes spicy, buttery, and juicy. Each serving has over 50 grams of protein, great for fitness or family meals.
Big Buffalo Flavor with a Lighter Cooking Method
You don’t need a deep fryer for this recipe. Baking gives you crispy texture and bold flavor with less oil and calories. It’s a hands-off process that lets you relax while your chicken cooks perfectly.
- Reduced fat content compared to fried versions
- Crispy exterior that stays crunchy
- Juicy, tender chicken inside
- Bold, authentic buffalo taste
- Less cleanup required
Perfect for Busy Weeknights and Game Day Gatherings
This recipe is quick, easy, and delicious for weeknight dinners. Prep work is minimal, and the oven does the rest. You can have dinner ready in about 30 minutes, perfect for busy nights.
For game day, this recipe scales up easily. Whether you’re hosting four or twenty, just adjust the chicken breasts. No deep fryer needed, and no stress. Your guests will enjoy top-notch chicken without the kitchen chaos.
| Cooking Method | Prep Time | Total Time | Fat Content | Cleanup Difficulty |
|---|---|---|---|---|
| Deep Fried | 15 minutes | 25 minutes | High | Very difficult |
| Baked | 10 minutes | 30 minutes | Low | Easy |
This recipe is versatile for any occasion. It’s great as a main dish, filling for wraps, or topping for salads. It’s perfect for any hungry crowd at your table.
Essential Ingredients for Perfect Buffalo Chicken Breasts
Creating a great buffalo chicken breast recipe starts with the right ingredients. Each part plays a key role in making the chicken crispy and flavorful. Knowing what you need and why is crucial before you start cooking.
The base of any buffalo sauce chicken is quality chicken breasts. Choose boneless, skinless breasts that are the same thickness. This ensures they cook evenly. Opt for breasts weighing 6 to 8 ounces each for faster and more even cooking.
For your buffalo sauce chicken, Frank’s RedHot Original Hot Sauce is the best choice. Its vinegar content enhances flavor and tenderizes the meat. Melted unsalted butter adds richness and mellows the heat, controlling the final saltiness.
| Ingredient | Amount | Purpose |
|---|---|---|
| Boneless, skinless chicken breasts | 4 pieces (6-8 oz each) | Main protein base |
| Frank’s RedHot Original Hot Sauce | 1 cup | Buffalo flavor and tenderness |
| Unsalted butter, melted | 4 tablespoons | Coating richness and heat reduction |
| Panko bread crumbs | 1 cup | Crispy coating |
| Garlic powder | 1 teaspoon | Savory depth |
| Kosher salt | ½ teaspoon | Seasoning balance |
| Freshly ground black pepper | ¼ teaspoon | Subtle heat and flavor |
| Blue cheese crumbles | ½ cup | Creamy topping |
Panko bread crumbs give your chicken a crispy exterior. They are larger than regular bread crumbs and fry up crunchier. Mix them with garlic powder, kosher salt, and black pepper for extra flavor.
Blue cheese is a key ingredient. Use a block and crumble it yourself for better flavor and texture. Fresh crumbled cheese makes a big difference in your dish.
Complete your meal with these essentials:
- Ranch dressing or blue cheese dressing for dipping
- Fresh carrot sticks for crunch and coolness
- Crisp celery sticks for contrast
If you prefer white meat alternatives, boneless chicken thighs work well. They cook faster than breasts, so watch your timing carefully.
Crispy Buffalo Chicken: The Secret to Restaurant-Quality Results at Home
To make crispy chicken at home like your favorite restaurant, you need two key techniques. These methods make your buffalo chicken stand out. They help you understand how to coat and marinate for the best results.
The right coating and prep time are key for that restaurant crunch and flavor. Use these techniques with the right cooking methods for results that impress.
Choosing Between Panko and Regular Bread Crumbs
The type of bread crumbs you choose affects your chicken’s crunch. Panko bread crumbs have larger, flakier pieces for better crunch than regular bread crumbs.
| Bread Crumb Type | Crumb Size | Crispiness Level | Browning Quality | Best Use |
|---|---|---|---|---|
| Panko Bread Crumbs | Large and flaky | Excellent crunch | Even, golden-brown | Baked buffalo chicken |
| Regular Bread Crumbs | Fine and dense | Moderate crunch | Uneven, can become soggy | Fried applications |
Panko crusted chicken stays crispy because it browns evenly when baked. Regular bread crumbs are too fine and can become soggy during cooking.
- Panko bread crumbs have more air pockets for superior texture
- Regular bread crumbs create denser coatings that trap moisture
- Panko works best for baked crispy chicken recipes
- Regular crumbs work better for fried applications
Why Marinating Makes All the Difference
Marinating your chicken in buffalo sauce does more than add flavor. The vinegar in buffalo sauce tenderizes the meat and seasons it from the inside out.
A 30-minute marinade is perfect. It lets the chicken absorb buffalo flavor and tenderize. Marinating longer than 30 minutes can make the chicken mushy.
- Place chicken breasts in a bowl or zip-top bag
- Pour buffalo sauce over the chicken
- Let it sit for exactly 30 minutes at room temperature
- Remove chicken and pat dry before coating
- Pat the surface dry to help panko stick better
This technique ensures your chicken is flavorful and tender. The vinegar breaks down the meat gently, keeping it juicy and firm.
By combining panko crusted chicken with a 30-minute marinade, you get restaurant-quality results. You can proudly serve this at any meal.
Step-by-Step Instructions for Baked Buffalo Chicken
Making easy buffalo chicken at home is simple. It takes about an hour, perfect for weeknight dinners. You’ll learn to prepare chicken, apply marinade, and get that crispy coating like restaurants.
Start by slicing chicken breasts in half lengthwise. This makes them thin and cooks faster. Then, flatten them to ⅜-inch thickness. This ensures even cooking.

- Place flattened chicken breasts in a 9×13 baking dish
- Pour buffalo sauce over the chicken, coating all pieces evenly
- Marinate for 30 minutes at room temperature
- Preheat your oven to 450°F
- Melt butter in a shallow bowl
- Spread panko bread crumbs on a flat plate
- Remove each piece from the marinade, letting excess sauce drip off
- Dip the chicken in melted butter
- Press firmly into panko, coating both sides completely
- Arrange on a lightly oiled baking sheet
- Bake for 10-12 minutes until the coating turns golden brown
- Check internal temperature reaches 165°F
The marinade step is crucial. It adds depth to your buffalo chicken. Buffalo sauce’s vinegar and spices penetrate the meat in 30 minutes.
| Step | Time Required | Temperature/Setting | Key Action |
|---|---|---|---|
| Chicken Preparation | 10 minutes | Room temperature | Slice and flatten chicken breasts |
| Marinating | 30 minutes | Room temperature | Coat chicken in buffalo sauce |
| Breading Setup | 5 minutes | Room temperature | Prepare butter and panko stations |
| Coating Process | 10 minutes | Room temperature | Dip and coat each piece |
| Baking | 10-12 minutes | 450°F | Bake until golden and 165°F inside |
Pro tip: Let excess marinade drip off before buttering. This prevents a soggy coating and helps panko stick well. Your buffalo chicken needs that crispy texture.
Look for visual signs when baking. Your chicken is done when panko is golden and meat is 165°F. Use a thermometer to check. Remove from oven as soon as it’s done to avoid overcooking.
Getting the Perfect Crispy Coating Every Time
The secret to crispy buffalo chicken is in the technique. You need the right way to coat and cook for that golden, crunchy exterior. This section will show you how to get it right every time.
The Butter Dipping Technique
Your butter dipping method is key for a great crispy buffalo chicken coating. Start by lifting your chicken from the marinade and letting some liquid drip away. This keeps the flavors close to the meat.
Next, dip both sides of the chicken into melted butter that’s cooled a bit. This step is crucial. The butter helps the bread crumbs stick and brown evenly.
The important step most home cooks miss is firmly patting the panko bread crumbs into the buttered chicken. Press the crumbs down with your hands to absorb butter. This is what makes your chicken crispy and golden.
Optimal Oven Temperature and Timing
Your oven temperature is crucial for baked buffalo chicken. Set it to 450°F for thin chicken cutlets. This high heat sears the outside quickly, making it crispy while keeping the inside moist.
Place your baking sheet in the top third of your oven. This gives the top of your chicken direct heat, toasting the bread crumbs to golden perfection.
Here’s your timing guide for perfectly cooked chicken:
| Cooking Element | Temperature/Time | What to Look For |
|---|---|---|
| Oven Setting | 450°F | Preheated and ready |
| Baking Sheet Placement | Top third of oven | Optimal browning zone |
| Cooking Duration | 10-12 minutes | Bread crumbs light brown |
| Doneness Check | 165°F internal temp | Chicken cooked through |
Watch your chicken closely while it cooks. The bread crumbs should turn light brown, not dark or burned. If it needs more time, give it a minute or two. Pull it out when the coating looks golden and crispy.
Lightly oil your baking sheets to prevent sticking. This helps the bottom of your chicken toast properly, giving you a crispy result all around.
Topping Your Buffalo Chicken with Blue Cheese
The final step of making buffalo chicken with blue cheese turns your crispy dish into a real restaurant-quality meal. It’s all about timing when you add the cheese. You want it to melt perfectly without burning your coating.
First, take your baked chicken out of the oven after the first cooking phase. Brush the remaining buffalo sauce over each piece. This sauce layer is perfect for your cheese topping. The chicken’s heat is key for the next step.
Now, sprinkle freshly crumbled blue cheese on top of each piece. Put the chicken back in the oven, uncovered, for 2 to 4 minutes. Keep an eye on it during this time. You’re aiming for the cheese to soften and melt into the spicy coating without getting greasy or losing its tangy taste.
Why Fresh Block Blue Cheese Makes a Difference
Don’t use pre-crumbled blue cheese for your buffalo chicken. The stuff in packets has additives that make it dry and gritty. Buy a quality block of blue cheese and crumble it yourself right before serving. This simple step adds bold, creamy flavor to your dish.
- Fresh block cheese offers superior flavor and texture
- Pre-crumbled cheese contains additives that dry out the cheese
- Hand-crumbled pieces melt more evenly and deliciously
- The tangy taste complements spicy buffalo sauce beautifully
The cheese’s slight melting creates a great contrast. You get creamy, tangy cheese and crispy, spicy chicken. Your buffalo chicken with blue cheese is now a perfect mix of flavors and textures. Your family and guests will love it.
Serving Suggestions and Pairing Ideas
Your crispy buffalo chicken is ready to impress. Serving and pairing it can make it a hit at dinner or game day. Think beyond just placing chicken on a plate—you have endless options to make this meal unforgettable.
Classic Accompaniments and Dipping Sauces
The traditional buffalo chicken experience comes complete with cooling components that balance the spicy kick. Serve your chicken with these essential sides:
- Blue cheese dressing or ranch dressing for dipping
- Extra buffalo sauce for heat lovers
- Fresh carrot and celery sticks for authentic buffalo-style service
- Sautéed broccoli for a green vegetable option
- Roasted zucchini for a lighter side
- Air fryer potato cubes for crispy texture
The cool, creamy dressings create the perfect contrast to the spicy chicken. Blue cheese dressing adds a tangy punch, while ranch offers a mild, comforting flavor. Keep extra buffalo sauce nearby for those who want additional heat.
Creative Ways to Use Leftover Buffalo Chicken
Don’t let your leftovers go to waste. Your crispy buffalo chicken transforms easily into new meals throughout the week.
| Leftover Idea | How to Prepare | Best For |
|---|---|---|
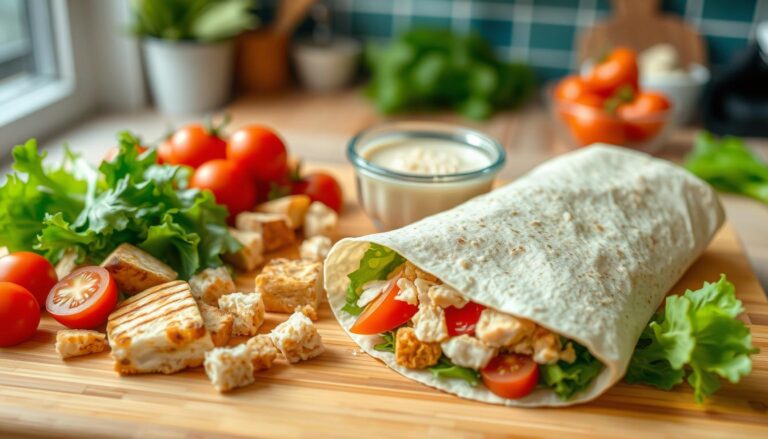
| Buffalo Chicken Wraps | Shred chicken and wrap in tortillas with lettuce and ranch | Quick weeknight chicken dinner |
| Buffalo Chicken Salad | Shred chicken and mix with mayo, celery, and blue cheese | Cold lunch option |
| Salad Topper | Slice chicken and place on green goddess or mixed greens | Healthy dinner solution |
| Game Day Appetizers | Cut into bite-sized pieces for cocktail party spreads | Game day chicken recipes and entertaining |
| Buffalo Chicken Sandwiches | Shred and pile on toasted bread with slaw | Casual weeknight chicken dinner |
Shredding your leftover chicken opens up endless possibilities. Mix it with mayo and celery for a classic buffalo chicken salad that works great for lunch. Pile your sliced chicken onto fresh salads to add protein and spicy flavor. Stuff it into wraps for a portable meal that works perfectly as a weeknight chicken dinner solution.
Storage and Reheating Tips for Maximum Freshness
Your homemade buffalo chicken is delicious right out of the oven. You’ll want to keep it tasty for days. Storing it right means you can enjoy it many times without losing quality or safety.
Put leftover homemade buffalo chicken in airtight containers in the fridge for 3 to 4 days. Keep the chicken and sauce separate. This stops the coating from getting soggy and keeps your fridge smelling good.

When reheating, you have two good options. An oven at 350°F is best for crispy coating. Heat for 10 to 15 minutes until warm. A microwave is quicker but the coating won’t be as crispy.
Try this tip: add a bit of fresh buffalo sauce and melted butter after reheating. It adds moisture and brings back the flavors.
- Reheat in a 350°F oven for 10 to 15 minutes for maximum crispiness
- Microwave for 1 to 2 minutes as a quick alternative
- Add fresh buffalo sauce and butter to refresh flavor
- Store in airtight containers to prevent odors
Freezing extends your chicken’s life to 3 months. Use airtight containers or heavy-duty freezer bags. Thaw in the fridge overnight before reheating. Never thaw at room temperature to avoid food safety risks.
Shredded leftover chicken makes a great cold buffalo chicken salad. Mix it with ranch, celery, and lettuce for a cool lunch. The crispy coating isn’t as important here.
Common Mistakes to Avoid When Making Buffalo Chicken
Making the perfect buffalo chicken recipe takes practice. Knowing what can go wrong helps you succeed. Avoiding common mistakes is key to a great dish.
Most errors happen before cooking. Understanding these mistakes helps you fix them early.
Marinating and Coating Mistakes
Marinating time is crucial. Chicken marinated too long becomes mealy. Stick to 30 minutes maximum for the best texture.
When coating, press panko firmly onto the chicken. Loose breadcrumbs fall off, leaving spots. Make sure to pat each piece down well.
Before buttering, remove excess marinade. Too much liquid makes the coating soggy. This ruins your dish.
Baking Sheet and Temperature Errors
Preparation of your baking sheet is important. Too much oil prevents the bottom from crisping. It traps moisture instead of promoting browning.
- Keep oven temperature at 400°F minimum for proper crisping
- Pull chicken at 160°F internal temperature, not 165°F
- Allow carryover cooking while resting for perfect texture
- Slice chicken breasts to uniform thickness for even cooking
Blue Cheese and Final Touches
Don’t use pre-crumbled blue cheese. It becomes dry and gritty. Crumble fresh blue cheese right before serving for better taste and texture.
“The difference between good buffalo chicken and great buffalo chicken lies in the small details you control.”
Avoid these mistakes, and you’ll make restaurant-quality buffalo chicken at home every time.
Conclusion
You now have all the info to make easy buffalo chicken that tastes like it’s from a restaurant. This recipe combines bold flavors with a healthier cooking method. In under 55 minutes, you can make a dish that’s as good as any sports bar’s.
Most of the time is spent marinating and baking, so it’s easy. Your easy buffalo chicken is perfect for any occasion. It’s quick for a weeknight dinner or impressive for a party.
The crispy coating and tangy blue cheese topping make it stand out. Home cooks love this recipe because it always delivers. It’s simple and versatile, making your kitchen a place of delicious food without stress.
Start gathering your ingredients today and bring this crowd-pleasing dish to your dinner table. Share your results with family and friends. Try different hot sauces or toppings to make it your own. Your cooking skills will shine, and your guests will be impressed.